

- How do Blinds2Go electric blinds work?
- The blinds I chose
- Measuring up
- Fitting the blinds
- First impressions
- Setting up and using the Tuiss app
- Charging
- Retrofitting
- The cost
- Pros and cons
- The verdict
Disclosure: We were provided this product by Blinds2Go free of charge to use and review. That does not influence our views.
I’m obsessed with making my home as smart as possible and getting it to do all the hard work. For me, window blinds are a big part of that. So when I saw some battery-powered (rechargeable via USB), wireless, automated and app-controlled blinds at Blinds2Go under the SmartView range, I had to give them a go. The options there are endless in terms of fabrics and styles, so I was spoilt for choice.
I’ve already tested and reviewed the Roller Shade Driver E1 before. I loved it so much that I went on to buy a load more to control other blinds around the home. They’re great, but they do have drawbacks and are obviously not native to the blinds. So I wanted to try something new, and the Blinds2Go option seemed like a no-brainer. Integrated battery-operated Tuiss motors within the blind itself, rather than a workaround for making dumb blinds smart. Plus, they’re very well priced if I want to get more!
How do Blinds2Go electric blinds work?
Taken from the Blinds2Go website:
Their collection of electric, made-to-measure blinds brings the ultimate in convenience and style. Featuring either a rechargeable, battery-powered motor or an innovative solar panel, there’s no wiring or tricky installation involved, allowing customers to fit their new motorised blinds just as quickly and efficiently as any other.
Their light-filtering electric roller blinds and Roman blinds provide daytime privacy while still allowing soft natural light to flow through the fabric. For rooms where light control is essential, their blackout lining helps stop light in its tracks, making it ideal for bedrooms and overlooked living spaces.
The range also includes elegant wooden electric blinds, electric skylight blinds designed specifically for roof windows, and electric awnings for flexible outdoor shading. With a wide choice of colourways - from white and neutral tones to vibrant blues, reds and yellows, plus everything in between - there’s a design to suit every home.
How are their electric blinds powered?
They use a smart, discreet battery pack to power their electric blinds, alongside solar charging for their electric skylight blinds. This approach allows for easy DIY installation, simple charging and impressive long-term reliability.
The blinds I chose:
I wanted to try something that might push the limits in terms of size and weight, so I opted to get a blind for a set of French doors in our living room. They’re in a recess measuring over 2.3m, so I thought this would be a tricky size for one automated blind. Certainly, the Aqara Roller Shade Drivers would struggle. I went for a roller blind with a cassette so the blind was hidden, improving the aesthetic.
My order:
Oculus Midnight Roller Blind
2353mm width x 2030mm drop (recess)
Electric SmartView - Controlled via the Tuiss app
Cassette Upgrade
Measuring up
Blinds2Go offer measuring advice on their website for all kinds of different blinds and fitting options, so I just followed it. For the width, I made sure to take the main measurement at the top of the recess where the blind would be housed. I also double-checked at different points further down the recess to make sure the walls were straight enough. If your walls bow a lot, it’s worth telling them about it and double-checking. The blind itself isn’t the same width as the cassette/housing, and you have at least 1cm of room on either side. You may have wonky walls in your house, so definitely check this!
Fitting the blinds
You can find the instructions here.
2 KEY points to think about before you do anything:
- If you’re getting a cassette blind like me, I would strongly advise you take the blind out of the cassette before you do anything. It’s not hard to do and will make your life a lot easier!
- When fitting the brackets, always take into account things like door/window handles and make sure you place the cassette in a part of the recess that will clear them when it comes down.
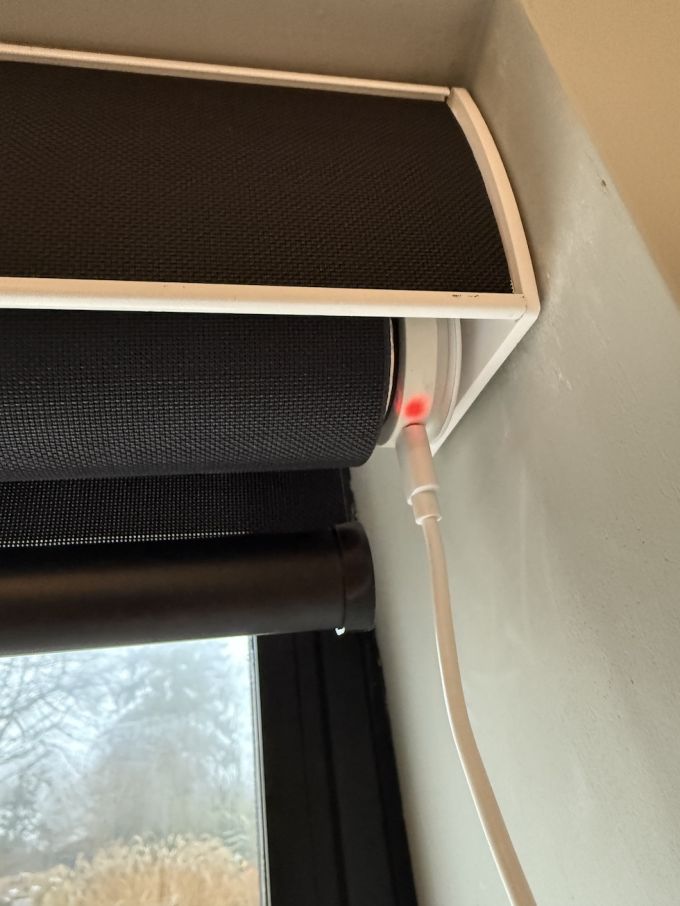
If you take the blind out of the cassette, it’s much more straightforward to fit the cassette without the additional weight of the blind. This blind over 2m was weighty! Getting the blind back in once the cassette is in place is really easy, so it’s definitely worthwhile. This was a happy accident for me. The charging slot and power button weren’t visible when it arrived, so I had to refit the blind into its brackets to re-orient it. If that hadn’t happened, I don’t think I would have thought to do it until much later in the process, so my loss is your gain.
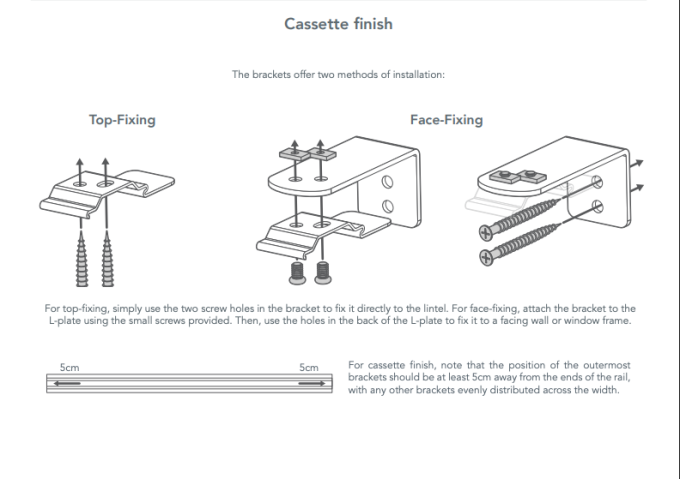
I opted for the top-fixing option for my blind, as shown here. The blinds come with all the necessary brackets, wall plugs and screws.
I absolutely love Fischer Duopower wall plugs, so I swapped them out. If you haven’t used them before, I thoroughly recommend them - they are FANTASTIC, but obviously the plugs supplied should do the trick.
The top-fixing option I went for means the brackets screw directly into the top of the recess, and then the cassette clips into them. A couple of things worth doing here:
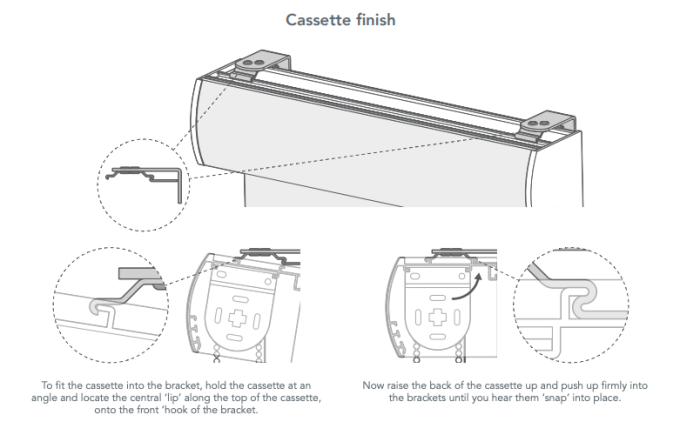
- Practice putting the brackets on the cassette so you know in your mind’s eye how they connect. Everything is a lot trickier when you’re mounting them in a recess, so I’d really recommend doing this. Here are a couple of handy videos to show how they connect and disconnect.
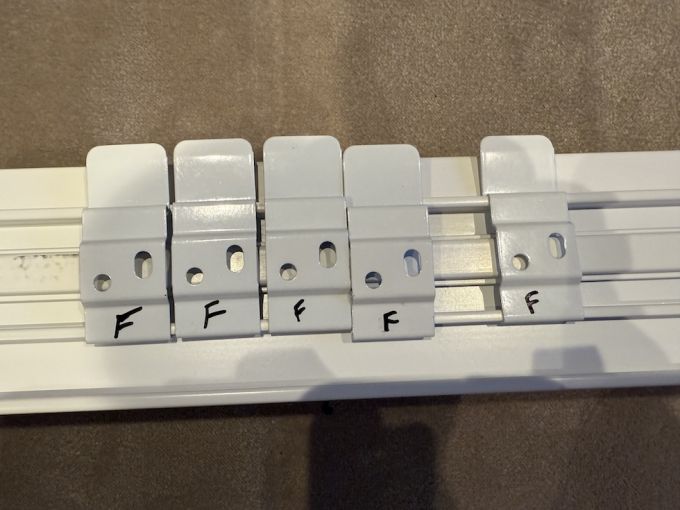
- Mark the top side of the brackets (the side that will face the top of the recess and be hidden) with an F to mark the front. This may sound over the top, but the last thing you want to do is make a load of holes in the top of your recess to find you’ve put them in the wrong way. I’m a firm believer in the measure twice, cut once mantra, and to me, this feels like the same thing. A stitch in time saves nine and all that.
Stops any mistakes! - Get the right drill bit! This is absolutely crucial. You will almost certainly need at least a masonry bit if you’re going into the top of a recess because you’ll be hitting a lintel. I recommend the Bosch Professional ones - they’re a few quid each but really are amazing. They even do ones that go straight into your Impact now, too. Now, if you’re unlucky enough to have a steel beam up there, you’re in for a bit of a ride. It is possible to screw directly into them, and I’ve had to do this before with bathroom blinds. Luckily for you, good old Charlie Diyte has a fantastic video on how to do just that:
- Wear goggles and a mask when drilling. You only get one set of lungs and eyes. Protect them!
Installing the brackets:
For installing the brackets, I did as I was asked in the instructions: left a gap of at least 5cm at either end (I opted for 10cm), then evenly spaced the rest. To do this, just work out the length of the gap between your two end brackets and then divide that gap by 1 + the number of brackets you have left. In my case, I had three brackets remaining, so I divided the gap by 4 to get the spacing between each bracket.
Finally, make sure you install the brackets in a straight line. So, measure from the front of the recess and make sure they’re all fixed on the same measurement. Leave a bit of play in the screws on each bracket until all are in place, then tighten with a manual screwdriver.
Fitting the cassette into the brackets
This was relatively straightforward, but I had a slight bow at the top of the recess, so it took a bit of force to connect the last bracket. I was definitely glad I’d watched those videos I linked to and made sure I understood how the brackets worked.
Fitting blinds always seems to take me longer than I expect, and I’m probably not alone. Something unexpected nearly always crops up, but these were very straightforward. Hopefully, if you take my advice, your fitting can be relatively painless too. I cannot stress enough the 4 points above!
First impressions
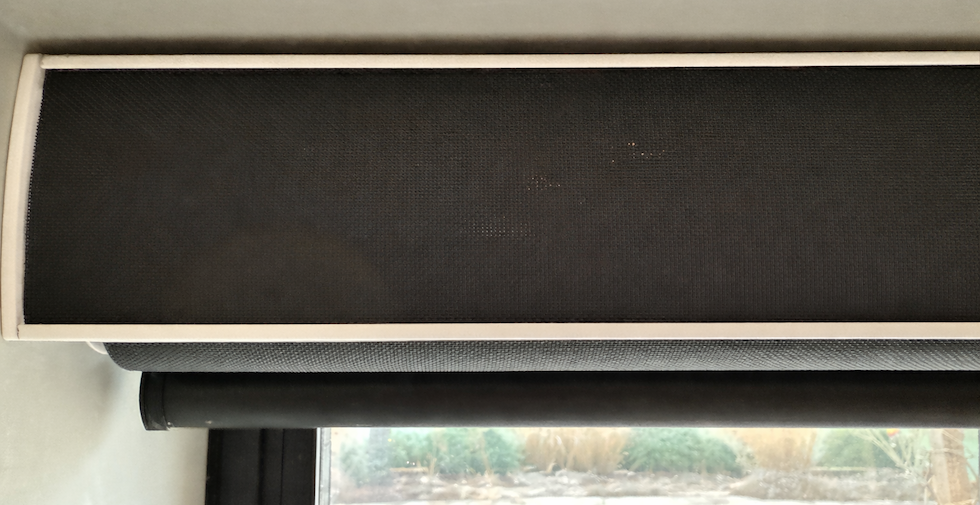
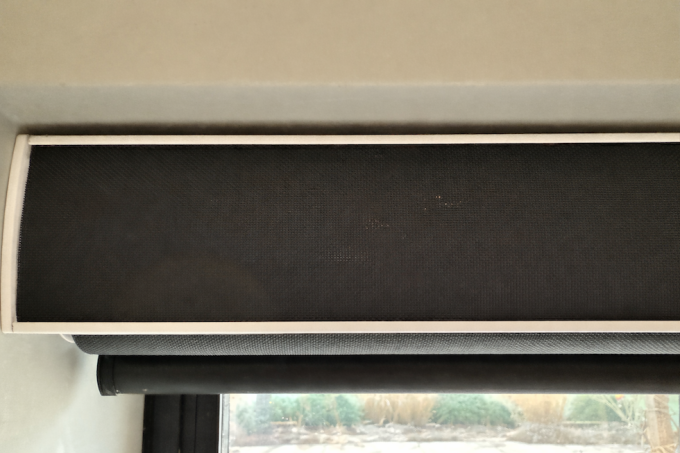
So with the blind back in the cassette, I was ready to go. First off, I was really impressed by the look and feel of these blinds. The fabric is of excellent quality and is just what we were looking for. Well done, Blinds2Go! It’s my first time with a cassette, and I don’t think I’d ever go back. Aesthetically, I really prefer them over a regular roller, which has everything on show. My cassette is in the same fabric as the blind with a matte chrome trim around it. The fabric colour was chosen in part to match the colour of the doors, which are in black aluminium. When looking at the blind from the other side of the room, you wouldn’t really know it was there. It blends in fantastically, and I’m thrilled.
These are smart blinds, after all, so I again followed Blinds2Go’s instructions and put the blinds on charge. You need to do that first. Once the blinds are fully charged, the light will turn from red to green. Thankfully, they come with a super-long USB-C cable so I can reach the blind from the nearest plug socket. If you’re not near a plug socket, you could either take the blind down or, to make life easier, use an extension lead or even a portable charger. I haven’t had these blinds that long, but Tuiss say their battery can last 6-9 months on a single charge. From what I’ve read online, this actually seems pretty accurate. Depending on usage, of course. If that’s the case, they are far superior to Aqara's battery life. Time will tell, but that sort of lifetime puts a smile on my face.
Setting up and using the Tuiss app
The blind comes with a handy little instruction card for starting up and downloading the right app. They’re super easy to follow, and I had no issues whatsoever. Now this is really important. The blinds communicate via Bluetooth, not via WiFi, although you do need an internet connection to set things up. That means you need to be near the blinds to set them up for use - both for first-time setup and ALL manual controlling in future. Pros and cons of this will be addressed later. There are several!
Setting everything up in the app is really easy. Each blind is unique and comes with its own QR code, which you can scan in the app to pair it. Keep this somewhere safe if you ever need to re-pair the blind in future. Once scanned, you’re guided through the process, and the blind gives a comforting little movement or noise every time you communicate with it to confirm it’s receiving a signal. You just set the bottom position, then the top position, and you’re away.
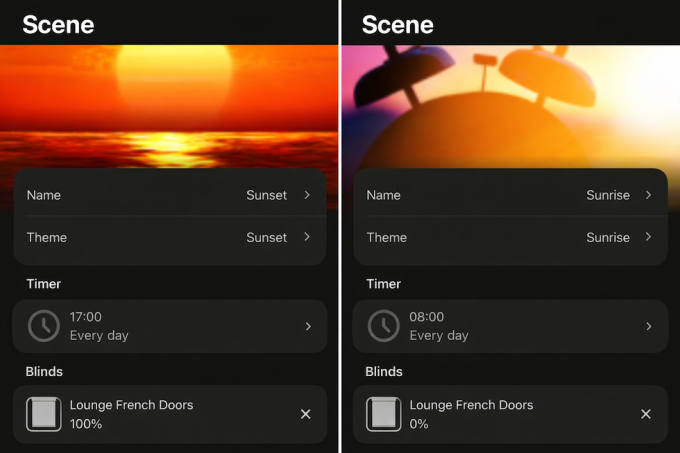
I immediately set up a couple of scenes. One for sunrise, which fully opens the blind at a chosen time in the morning and one for sunset, which closes it in the evening. They’re easily customisable, i.e., the days of the week you want it to run and the times. It’s worth pointing out that the time is fixed, not dynamic, so don’t let the default scene names Sunrise and Sunset fool you. I do wish it could be dynamic based on actual sunrise and sunset times, but obviously, it would need to be run over the internet to do so. That’s going to mean I will probably have to update those scenes over the course of the year to run at different times.
I have to say everything has been extremely smooth sailing so far. The blind moves very smoothly up and down, even for one this size. You wouldn’t get the same from the Aqara option, which I’ve found can be quite jerky on larger blinds, which invariably messes up your top and bottom settings. This system has been flawless so far. Once those scenes are set, they’re programmed to your blind so there’s no need for any Bluetooth connection, etc. So far, so good. Very impressed!
As a bonus, you can also control the speed at which the blinds move, which Aqara doesn’t offer. There are separate speed settings for your scenes and for manual control, which is nice.
Here’s a handy FAQ from Blinds2Go for the Tuiss App and Smartview Blinds.
Charging
Given the long battery life, this may be only a minor concern since you’re only doing it a few times a year. For hard-to-reach blinds or those far from a plug socket, charging could be a bit of a faff. With the Aqara Drivers, you can simply slide them off their wall bracket and take them off to charge pretty easily. With these, you have to get to the top of the blind to charge them. As I said, the USB-C cable provided is very long, but it won’t be long enough for every blind, so you’re either looking at an extension plug board or a portable charger. For a window behind a desk like the one I’m writing this on, I would have to climb up on the desk to get access. There is the option to get a solar charger, which could be hidden behind the blind on installation and then plugged directly into the USB-C port. Worth thinking about.
Retrofitting
If you’re thinking about retrofitting, it’s a toss-up between this method and the Aqara one. One fits into the roller itself, and the other controls the existing chain. Your main factors to consider are cost, aesthetics, and ease. Personally, I think that if you can set aside the Bluetooth limitations and voice integration, the additional cost of the SmartView is well worth it. That is just going to be a personal choice for you, especially if you’re not willing to shell out on the Raspberry Pi workaround.
At the time of writing, the Smartview costs £65.95, compared with £44.99 for the Aqara. I also think aesthetically they’re a lot more pleasing on the eye. Having no chain at all is excellent!
In terms of ease of setup, I can only talk about the Aqara, which was extremely easy indeed. I will try to get a new article up to describe the SmartView retrofit process for comparison. My gut is that it’s pretty straightforward, but we will see.
Finally, as far as I’m aware, you can only retrofit SmartView on roller blinds. You can buy it new for all the different types of blinds I wrote about earlier, but I can’t see a device you can retrofit onto a Roman. I’ve got the Aqara’s on several Romans, so they will be staying. Anything with an existing chain and the Aqara will work.
The Cost
As I stated at the beginning, these blinds were given to us in return for using and reviewing. That said, I can breakdown what they would have cost:
- Electric Roller Blind in Oculus Midnight Fabric - 2353mm width x 2030mm drop - Recess Fitting
- Electric SmartView
- Cassette upgrade
- SureSize Insured
Total cost £267.87
Blinds2Go are very competitively priced. I think for a blind this size with full automation and a cassette, that’s a great price. They’re always running special offers and deals as well, so you can keep your eyes peeled for those if you’re looking to save even more money. For example, at the time of writing, there’s a January sale with up to 25% off Roman Blinds and curtains, plus free blackout lining upgrades.
What is SureSize Insurance, you ask? Well, you can add SureSize to your order during checkout. It means that even if you make a mistake with your measurements and your blind doesn’t fit, you can claim a replacement. The only cost to you will be any price difference if your new measurements are larger. We won’t charge you for the delivery of the replacement.
Pros and cons
My experience so far has been great. I can’t fault the quality of the blind and the motor within it. It ticks an awful lot of boxes and runs incredibly smoothly. I am overall a happy customer, as I said earlier. There are absolutely tonnes of choices when it comes to electric options from Blinds2Go, so they will have something for you. It’s not just roller blinds. You can get:
- Wooden Blinds
- Roman Blinds
- Roller Blinds
- Double Roman Blinds
- Pleated Blinds
- Skylight Blinds
- Awnings
- Curtains
That being said, there are some limitations to the Tuiss/SmartView ecosystem that may affect my decision on future purchases.
For me, the biggest issue is choosing Bluetooth over Wi-Fi. It does mean that you don’t need a hub somewhere in your house to connect it to the internet, which would be an additional expense, but in my opinion, that would be totally worth it. Before I outline the downsides of Bluetooth, it is worth pointing out that by using Bluetooth, Tuiss will have been able to keep its costs down and, therefore, the costs to you, the consumer: no ongoing server costs, no GDPR considerations, and no risk of breaches. As blinds go, these are very well priced! It makes for a much simpler setup and prolonged battery life, too. Plus, you’re not reliant on them maintaining a cloud service in the future, and your blinds will continue to work if your internet goes down. Now onto the limitations.
Cons of Bluetooth Communication:
- No Alexa or Google Assistant integration, including voice control. This is a pretty big deal. Out of the box, there’s no way to get this integrated with Alexa or Google Home. That means not only can you not control them with your voice, but you can’t set up advanced routines and link other smart devices, e.g., motion detected on a camera to make blinds move, etc.
In the FAQs, they say that on Apple iOS mobile devices, SmartView Blinds can be operated using Siri Shortcuts. Shortcuts can be configured in the SmartView app or by using the Shortcuts app on your phone. However, you still need to be within Bluetooth range, so it is really limited. - As I said earlier, it also means you can’t set up dynamic timing scenes. I would absolutely love it if I could make the blinds open and close in sync with sunrise and sunset.
- You have to be in proximity of the blinds to use them. I would 100% advise you get a remote for the extra £24.99. I didn’t, so every time I want to move the blinds, I have to get out my phone to do it (no Alexa integration, remember). Plus, I have to be within Bluetooth range. So if I randomly want to get out the doors while the blinds are down, I’ll have to get my phone out/find it, connect and then operate the blinds. There are no manual buttons anywhere on the blind itself. That feels like a miss to me. Just having fully open and fully closed buttons on the blind where the charging port is would be incredibly useful. If you have them in guest rooms or an AirBnB for example, a remote is a necessity. I will be getting a remote.
Note: there IS a smart home workaround for Alexa integration involving Home Assistant, a Raspberry Pi, and Bluetooth Proxies. I will write a whole article explaining this in the future, but if you’re not tech-savvy, this won’t be for you. So make sure you’re aware that, when buying these blinds, they communicate over Bluetooth and what that entails. For most people, it won’t be a deal breaker.
The verdict
Should you buy these? Will I buy more? The short answer is yes, but read everything here first so you have a good idea of what you’re getting.
If you’re looking for a very straightforward motorised blind that’s dead easy to set up, of good quality, and you aren’t bothered about voice control or complex routines, then these are definitely for you. They look great, feel great and work amazingly well. I would absolutely get remote controls. With each remote, you can control 14 different blinds, which should cover most bases. The remote comes with a wall bracket, so my advice would be keep it next to the blind.
If you’re somewhere in the middle, you’re working towards a fully smart home but aren’t hugely technical (Home Assistant, Raspberry Pi’s, etc., seem a bit too much for you), then there is definitely still a place for them, and it will be down to personal choice. For a low-traffic area you don’t want to go in and out of, or something like a bedroom window where the blinds pretty much open and close once a day, these are fantastic. If you’re thinking of using them on a patio slider, which you go in and out of a lot, you’ll want a remote dedicated to that blind, mounted next to it, which will push costs up (remotes cost £24.99 at the time of posting. If you’re getting lots of these around the house, that’s worth considering.
I prefer them in quite a few ways over the Aqara Roller Shade Drivers.
- They’re native to the blinds themselves.
- The battery life is very, very good.
- No re-adjusting top and bottom settings if the blinds jerk up or down
- No large controller on the wall connected to the chain itself. They’re much more aesthetically pleasing.
- They’re pretty quiet
- They can also be retrofitted
- Sometimes the chain can get caught up in the fabric with the Aqara. They do stop instantly, and I’ve had no damage to my blinds, but they will stay locked in that position until they are programmed to go the other way again.
If you go for Smartview, you may just have to edit scenes a few times a year to match the season and get them opening and closing at the right time, if that bothers you. So you may find yourself choosing the SmartView option for most of your blinds and Aqara for the others.
Personally, if I didn’t go down the Home Assistant route, I’d probably transition to these for a good chunk of my blinds and keep Aqara on others. I’m really, really happy with them. If everything goes well in Home Assistant, I’d consider having them on every blind
What do you think of Blinds2Go's Electric Smartview Roller Blinds? Let us know in the comments below!

Thanks for this really helpful review. Planning to get a pair of these to add blinds to our kitchen bifold doors - I will have to fix to a steel, so the link to charlies YT video was good to see. I already have HA and a BT proxy near the doors, so just need to pick up the custom component from HACS.
Thanks, we're glad the review and Charlie's video were helpful! It sounds like you've already got everything in place, so hopefully the installation goes smoothly.